Shop Fronts
So as we were now to have our shop fronts laser cut, this enabled us to really put smaller, more refined details into the designs. With the option to have areas engraved we could add a nice 3-dimensinal element to the sketches as well as being able to use hand drawn text. So the images below are our designs for the individual shop fronts. Bec and Elise designed two shops fronts each, trying to get the feel of the time period from our design manifesto with appropriate shops.

Photography shop front designed by Bec

Tea Suppliers shop front designed by Bec
So after looking at reference photos from the 50's and 60's we took inspiration from elements such as having shop numbers on the titles and decorations around the shop windows.
Then we also designed our text to fit with the designs of our shop fronts. 
Text design by Bec
|

Shop front designed by Elise

Shop front designed by Elise

Text design by Elise

Text design by Elise
|
We had 4 different designs for the shop fronts as they will be interchangeable so that we can fake the movement of Mabel, and make it seem like she has moved further down the street.
Preparing for laser cutting

Bec working on Abode Illustrator
|

|

|
To be able to prepare for laser cutting we had to transfer our drawings into Adobe Illustrator.
We had to put the lines into the correct colours so that it translated to the laser cutter correctly. So if you want a line to be cut, it must be put in red and if you want a line engraved then it needs to be in green. Each element had to be taken from our designs and individually put into Illustrator so that it would be cut separately. As we were also working with forced perspective as well we had to have those shop front elements put in as well. As we had all our sizes sorted out, we had to fit the designs into the correct size of our wood. We are using MDF for the shops as the material is fairly cheap and is not too heavy. So the Illustrator file had to comply with the size of the wood and all the bits had to fit in. As can be seen in the images there were a lot of elements for the 8 different shop fronts. For Elise and Bec it was quite a steep learning curve but they got there in the end. 
|
We also had to find the correct scale for the shop fronts that would be used on the forced perspective set. To do this, Bec scanned in the technical drawings of the shop fronts and of the scaled down perspective wall. After doing this, it was possible to line the shop fonts up in Adobe Illustrator and skew them till they fit the image of the perspective wall. The correct sizes could then be figured out and then it was just a case of drawing the lines in, so the laser cutter knew what to do.

Perspective shop front file by Bec
|

|
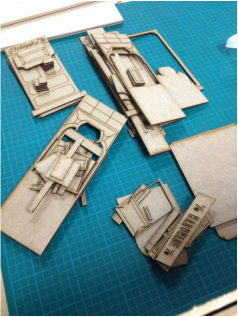
Getting it cut!

|
|
So here are all the bits! After two hours of laser cutting, all the billions of elements of our designs have been cut and engraved. All that's left now is the important task of painting the shop fronts. Oh and the rest of the set of course!


|
So going back to our designs we fished out all the elements that were ours and began piecing them back together, which was surprisingly harder than we thought.
But we managed and all the parts came together, ready to be prepared for painting and sticking. |

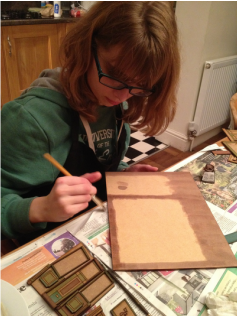
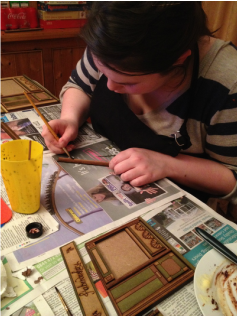
The next step was to test out colours and different materials for the shop fronts under camera. Elise and Bec tested a mix of different materials and colours. This varied from water down acrylics and inks to varnishes. We knew that we wanted quite earthy colours that were not too over bearing on the puppets. We also experimented with using sand paper over the top of the paints and different transparencies of paint.
|
After seeing the colours under camera and discussing with the group we made the decision to use inks for our shop fronts and to just stick with 3 colours so as not to over complicate the design.
Our choices were: - Apple Green and Peat Brown mixture - Peat Brown - A neat mixture and a watered down mixture - Aquamarine - watered down mixture So each element needed to be painted, and as there were quite a few of them we decided we needed to do a very quick plan of where we would put each colour. This was achievable on photoshop. We were then raring to go! It took a fair amount of time to paint each piece but it was finally done and the shop fronts were now ready to be finally stuck together. |


|
|
|

The final colours of the shop fronts. They all work nicely together and just need to be super glued together!

Close up window design by Bec
|
We then needed to think about what was going to be done in the window frames on the shop front.
As we were under time pressure we had to go with simple answer which was to create 2D drawn window displays. This was a quicker option than what we had hoped to do, which was to create window boxes and make small props to go inside. So Bec and Elise each designed the windows for their shop fronts, taking into account the time period and what type of shop it was. These drawings were then printed out and stuck on under acetate which gave a slight reflections which helped to create the sense of a more natural window. |


The final shop fronts, coloured and glued and put in front of the finished wall. Each of the shop fronts had Velcro on the back of them so that they could be changed over and the wall and floor could be re-use as another set.
Click here to see final photos of the sets.
Click here to see final photos of the sets.
